Showing posts with label icing. Show all posts

Tuesday, August 17, 2010

Wilton Class #3 - Flowers!

Last night was my third Wilton decorating class, and we learned a few different kinds of flowers as well as how to properly ice a cupcake.  I used my basic vanilla butter cake recipe; while preparing the batter, a certain little boy distracted me and I put a tablespoon of baking power in the batter instead of teaspoon, SO these cupcakes were extra fluffy =) It's good to know that a little extra baking power doesn't effect the taste! My favorite flowers are the drop flowers, but the shaggy mums are really fun to make.  I think the most useful thing I learned is the proper 'swirl' for the top of the cupcake - so pretty! Here are a few pictures!
Pom Pom Flower and Shaggy Mum
The petal flower my teacher showed me
Drop Flowers

Shaggy Mum and Pom Pom Flower
All the cupcakes sittin' pretty on the cake stand.  They made it home in one piece!
Next week we make our final cake with writing!  We also learn the Ribbon Rose, which is my favorite (in pictures, anyway).  Next up in the baking order is a special surprise for a very special someone - watch for the blog tomorrow or Thursday.  Happy Baking!

Sunday, August 8, 2010

Who doesn't love a s'more? Oh, and a strawberry muffin, too!

One of my most favorite flavor combinations, ever, is toasty graham cracker, chocolate, and marshmallow - yep, S'MORES!  This is the first cupcake I really made into my own creation, and I am super proud of how they turned out.

To create a cool, layered effect, I combined a few different recipes.
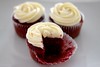
Here is what the cupcake looks like cut in half:

For the graham cracker crust:
1/4 cup melted butter
1 cup graham cracker crumbs
- Mix together and press, firmly, into the bottom of cupcake paper -

For the chocolate cake, I used a recipe adapted from Martha Stewart's One-Bowl Chocolate Cupcakes:
3/4 cup unsweetened cocoa powder
1 1/2 cups all-purpose flour
1 1/2 cups sugar
1 1/2 teaspoons baking soda
3/4 teaspoon baking powder
3/4 teaspoon salt
2 large eggs
3/4 cup warm water
3/4 cup 2% milk
3 tablespoons unsweetened applesauce
1 teaspoon pure vanilla extract
- Fill each cupcake paper 2/3 full, on top of graham cracker crust, and bake at 350 degrees for approximately 18 minutes. -

For the homemade marshmallow frosting, I used Martha Stewart's Marshmallow Frosting recipe, cut in half.  It is a rather difficult frosting to make, with the double boiler and all, but totally worth it.  I may never buy marshmallows in a store again! For the tops, I filled a disposable frosting bag with the marshmallow and fit the bag with the 1M star tip, and simply swirled the frosting on top.  I finished them with a sprinkle of crumbled graham crackers.  I will be using this frosting on SO many more baked goodies - it was perfectly sweet, fluffy and delicious.


I sent 8 cupcakes to my parent's house (I couldn't have all that tempting yumminess laying around my house!), and had to get thrifty and creative in my packing.  I made foil rings and stuffed around the edges with wax paper.  My mom reported a perfect trip and arrival! My husband said these were his favorite cupcakes, ever, and I just had to agree!  I am definitely keeping this recipe for future baking!

On Friday morning, I decided to try and redeem the fallen blueberry muffins with a more "healthy" strawberry muffin with the same streusel topping.  The goal was for these muffins not to fall.  I succeeded!

                                
I used a recipe adapted from Here:
1/2 cups all-purpose flour
1 cup whole wheat flower
1/4 cup white sugar
1/2 cup packed brown sugar
1/2 teaspoon salt
2 teaspoons baking powder
1/3 cup unsweeted apple sauce
1 egg
1/3 cup milk
1 cup fresh chopped strawberries
-Mix all dry ingredients together.  In a separate bown. mix wet ingredients.  Add wet ingredients to dry ingredients and stir until just combined.  Fold in strawberries.  Fill muffins papers all the way to the top. -
Streusel topping:
1/2 cup brown sugar
1/3 cup all-purpose flour
1/4 cup butter, cubed
1 1/2 teaspoons ground cinnamon
- Mix all ingredients together in a small bowl.  DO NOT MELT THE BUTTER.  Sprinkle a healthy tablespoon on top of each muffin. -

I baked these muffins at 400 degrees for about 18 minutes.  If you remove them from the pan while they are still warm, the muffin top will pull away easily and not stick.  My Daddy and husband both said they they preferred the taste of the blueberry muffins, but they enjoyed the strawberry a lot.  These have a more hearty feel and pretty brown color from the whole wheat flour and brown sugar - definitely a keeper.

Happy Baking!

Monday, August 2, 2010

Wilton Decorating Basics Class #1 ... and a Mad Men Inspired Tiramisu

Tonight was my very first Wilton decorating class!  I learned so much about torting and icing a cake - ya know, those things you thought you knew, but, really, you didn't?  These classes are definitely going to be a great learning experience.  We learned how to fill icing bags the easy way and how to pipe stars.  I will post pictures of our projects as I do them in class.  Tonight we mostly watched and learned, and, after all the watching, I decided I must have a Wilton Trim N Turn Plus Cake Turntable and 10" Cake Leveler - how have I ever done anything without these tools!

The instruction sheet for this week's class called for 6 sugar cookies to decorate in class.  So, after much internal debate about whether or not to buy said cookies at Publix, I decided to make them.  I have always had a hard time making "cookie cutter cookies"; my cookies always look a bit more "rustic" ;-)  So, today, I searched the web high and low and finally found an amazing recipe that I altered just a bit by adding more sugar and vanilla.  You can find the recipe here.  Instead of rolling out these cookies, I formed them into perfectly round balls, rolled the balls in sugar, and then smashed them with my palms onto prepared wax paper - this is A LOT easier than a rolling pin (and a lot cleaner), and your cookies turn out thick, fluffy, and sparkly! I'll take delicious over perfectly flat any ole' day! Here are some pictures I took after piping stars onto my cookies in class (we ran out of time and only had 15 minutes, so we did not get to color the icing):


As most of you know, AMC's Mad Men shows on Sunday nights.  In honor of this glorious show, my husband and I always make a special dinner and have a nice wine or cocktail while watching.  Yesterday, we decided to go Italian (surprise!) and make a copycat of Macaroni Grill's Penne Rustica (recipe here), and what goes better with Penne Rustica than, you guessed it, tiramisu!  Since the new rule in my home is "no more store bought desserts", of course, I had to attempt to make the said tiramisu.  In my normal fashion, I scoured the Internet and found a basic recipe here.  I sent my sweet husband after the ingredients, and, wouldn't ya know it, Publix did not have any marscapone cheese .... NONE!  So, I subbed in 8oz. of cream cheese, 1/4 cup sour cream, and 2 tbsp whipping cream, and it worked beautifully.  I must admit that it was quite nice to not have to bake anything - I just chilled it in the fridge until it set up!  It is not the prettiest tiramisu I've ever seen, but it sure did taste great =)  Here are some pictures:


Next up ... Wilton class #2 and a picture transfer cake!

Sunday, July 25, 2010

Practice, Practice, Practice

Lesson learned #1: decorating baked goods is difficult and should not be attempted in haste or before completing decorating classes.  I was so excited to get started that I jumped the gun and tried to make things pretty before I was prepared or ready.  The attempts were lots of fun and tasted delicious, and I like to think that that is the most important thing, right?

I made a red velvet cake for my Mom's birthday.  I used this recipe by Wilton and a basic cream cheese icing.  I researched a lot on trimming and icing the cake correctly, and that part went beautifully (I was actually very proud!).  However, the decorating part was not so perfect, and not what I wanted it to be at all.  Practicing with this cake made me very very excited for my class to start next week! Here are the results:


Wednesday, July 21, 2010

Happy Birthday To My Joshua

Yesterday, I made a carrot cake for my husband's 25th birthday. Carrot cake is his favorite, so I wanted to try something new (I have made many carrot cakes in my life, and have never really been impressed with one). I decided to use Wilton's carrot cake with white chocolate cream cheese icing recipe, only I subbed in one cup of wheat flour for one of the plain and one cup brown sugar for one of the plain - it was scrumptious and will definitely replace my old recipe!


I love that the carrot is actually visible in the cake! It was super moist and had just the right amount of spice. The icing was a little rich for my taste, I will probably lighten it up next time as well as use a firmer icing so that the cake looks more professional. All in all, it was a big hit, and definitely the best carrot cake I have ever made!

Next up ... Red Velvet Cake and Fresh Strawberry Cupcakes!