Showing posts with label chocolate cake. Show all posts

Wednesday, November 24, 2010

More Holiday Cakes!

I made a couple more Thanksgiving cakes for a friend last night - here they are!

Rustic Fall Trees
Chocolate Cake with Cookies-N-Cream filling.  Frosting and 'rustic' decorations are buttercream.
* This cake was inspired by Bakingdom's blog *

Fancy Thanksgiving Cake
Vanilla butter cake with chocolate buttercream frosting and scroll work.  Topper is silk. 
Last night was my very first "off" night when it comes to caking ... many lessons were learned and mistakes corrected! I guess it happens to everyone ;-)  I'm very happy with how these turned out and I hope my friend and her family enjoy them!

Monday, September 27, 2010

Wilton Flowers and Cake Design Final Cake

Tonight was my last class for the Wilton Flowers and Cake Design course.  We learned the basket weave and got to use our flowers on a cake.  Since my birthday was yesterday, this is my "Day Late Birthday Cake" for myself, so, naturally, it was chocolate!  Due to lack of time, I used a cake mix (gasp!) that I doctored up, and it turned out wonderfully. 


Devils Food doctored cake mix with chocolate buttercream filling and vanilla buttercream frosting

Close up of royal icing roses (made during the Greys Anatomy premiere last week!)

View from the top - I LOVE the reverse shell border!


Our class manual told us to bring 3 cups of frosting, needless to say, it wasn't enough - only half my cake got the basket weave!  My teacher was really surprised that the  manual thought 3 cups would be enough, I guess now we know! You can see where I had the rest of the cake marked for the basket weave.
 Doctored Chocolate Cake Mix Cake:
1 package of Devils Food cake mix
1 package of Dream Whip
1 tablespoon of Meringue Powder
1 small (individual serving size) container of applesauce
1 cup of water
4 eggs
Method:
Mix all ingredients in a large bowl.  Beat on medium low speed for 5 minutes and pour into your prepared pan.  Bake at 350 degrees for approximately 50 minutes, or until a knife inserted in the center comes out clean. This recipe filled my 8x3 round pan very nicely, but would be plenty for two 8x2 pans, as well. 
**After much experimentation, I have learned that greasing and flouring your pan and lining the bottom with parchment paper makes for the PERFECT cake release!

This doctored cake mix saved me SO much time - I baked, cooled (in the freezer), made frosting, and lightly iced this cake in just 2 hours. Next Monday, I start the Fondant and Gumpaste course - I am so excited!

Happy Baking!

Friday, September 10, 2010

Barbie Cake!

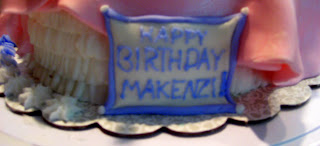
Earlier this week, I received my first ever real cake order! My mom often takes my left-over baking adventures to work, and a lady that works in the office (and has sampled my work), asked me to do her little girl's birthday cake.  The little girl, who is turning 7, wanted a Barbie cake.  I have never done a Barbie cake before, but after watching many videos on assembly and looking at lots of pictures, this is the final result:
Chocolate cake with buttercream icing, covered in and accented with homemade marshmallow fondant
The assembly of the cake was much easier than I expected it to be.  I baked two 8x2 round cakes and one dome shaped cake in a Pyrex bowl.  (Note: when baking in a Pyrex bowl, do not overfill and allow for 15 extra minutes baking time).  I used the same chocolate cake recipe from Dad's Tuxedo Cake (found a couple entries down) for its stability and tastiness. I cut a round hole in the middle of each cake, for Barbie to go in later. Then, I stacked the two 8x2 cakes on top of one another, using buttercream frosting as filling, and then stacked the dome on top of that.  I made sure the cakes were very very cold before assembly and this made it much easier to work with.  I had to trim up the sides a little bit because the round cakes were wider than the dome. I then covered my skirt-shaped cake in a crumb coating of buttercream frosting, put Barbie in the center (her bottom half is wrapped in plastic wrap) and let it set up, in the fridge, over night.

I made the marshmallow fondant earlier this week, using a basic recipe I found on cakecentral.com:
16 oz mini marshmallows
3 tablespoons of water
2 lbs of powdered sugar
pinch of salt
1/2 cup Crisco vegetable shortening
1 teaspoon vanilla flavoring
- Melt the marshmallows and water together in the microwave.  Add the vanilla.  Coat your hands, the bowl, and the counters in Crisco. Add the sugar and stir until you can not stir anymore. Dump the fondant out on your greased counter and kneed like you would a dough until it forms a stretchy yet solid ball.  Wrap in plastic wrap and let it set at least overnight before use. -

I tinted the fondant pink with Wilton gel icing colors and rolled it out.  Then, I cut a hole in the center of the round of fondant for Barbie and dropped it over the cake.  Very quickly, before the fondant stretched too much, I pinched it all together in little gathers at the top of her waist, to form the pleats. The natural fall of the fondant formed a pretty skirt.  I filled in the open places at the bottom with buttercream ruffles, to look like a petticoat.  The rest, just kind of came to me as I did it, therefore, I can't really give specific instructions.  If you have any questions, please feel free to ask me! =)

Here are some pictures of Barbie from every angle:

The petticoats are my favorite =)
The back, with a flower bow at her waist
The fondant fell and made pretty, natural looking fabric
The little frosting star pillows are for candles - there are 7.
I wish my writing was better.  Practice, Practice, Practice!

Well, there she is!  I'm really happy with how Barbie turned out, and I really hope the family enjoys their cake.  Lets all keep our fingers crossed that delivery goes smoothly!

Happy Baking!

Sunday, August 29, 2010

Tuxedo Cake for Dad's 50th!

I believe that every special occasion deserves something fancy - so, what better than a Tuxedo Cake to celebrate my Daddy's 50th birthday!  This cake was very ambitious, and did not turn out "perfect", but it was scrumptious and had a personality of its own.
4 layers of dark chocolate cake, whipped cream frosting, chocolate ganache and buttercreram decorations ... whew!

All lit up and ready for the party!

I found the recipe for this cake here at The Baking Pan.  Because of the complexity of this cake, the only variation I made from this recipe was that I used two 8x3 round pans to make 4 layers instead of the 3 9x2 pans the recipe calls for.  Next time, I may go for the shorter cake, just for convenience. 

Tuxedo Cake


Ingredients:
Batter:
4 cups granulated sugar
1 cup unsweetened cocoa powder
4 cups all-purpose flour
1 tablespoon baking soda
½ teaspoon salt
1 cup buttermilk
1 tablespoon pure vanilla extract
1 cup (2 sticks) unsalted butter
1 cup canola or vegetable oil
2 cups water
4 large eggs

Whipped Cream Filling and Frosting:
4 cups chilled whipping (heavy) cream
1¼ cups confectioner's (powdered) sugar

Chocolate Glaze:
4 ounces bittersweet chocolate, chopped into small pieces
½ cup whipping (heavy) cream
¼ cup Lyle’s Golden Syrup ** I could not find any of this syrup in my local Publix.  I subbed 3 parts light Karo Syrup and 1 part Molasses.
2 teaspoons pure vanilla extract

Directions:

1.Preheat oven to 350o degrees F. Prepare three 9-inch round layer cake pans; lightly grease the pans with shortening, line with parchment paper, and then lightly grease the top of the parchment paper and dust with flour.
Batter:
2.In a large mixing bowl, combine sugar, cocoa, flour, baking soda, and salt; whisk together to mix. Set aside.
3.In a small bowl, combine buttermilk and vanilla. Set aside.
4.In a medium heavy saucepan combine butter, oil, and water. Heat over low heat until the butter is melted, stirring occasionally with a wooden spoon or rubber spatula.
5.Pour the butter mixture into the sugar mixture. Using an electric mixer on low speed, or a wire whisk, stir or whisk until combined and smooth. Scrape down the sides and bottom of the bowl with a rubber spatula so the mixture blends evenly
6.Crack the eggs into a small mixing bowl and whisk with a fork to thoroughly break up the eggs, and then add the eggs to the batter, stirring until thoroughly combined. Add the buttermilk mixture, stir until combined.
Bake:
7.Pour the batter into the prepared pans. Bake 40 to 45 minutes or until a long toothpick, wooden skewer, or cake tester inserted in the center comes out clean. Remove from oven and place pans on a wire cooling rack to cool for 10 to 15 minutes then remove cake from the pans and place the cake on the wire cooling rack to finish cooling. Cool completely before frosting.

Whipped Cream Filling and Frosting:
8.In a large mixing bowl, using an electric mixer, beat the whipping cream until soft mounds form; gradually add the powdered sugar, continue beating until thick and stiff. Tip: the cream will whip easier if the mixing bowl and beaters are first chilled; place in the refrigerator to chill until ready to whip the cream.
9.Place one cake layer on a cake plate. Using an offset spatula thickly spread some of the whipped cream over the top. Top with the remaining cake layers, coating the top of each with the whipped cream, and then covering the sides of the cake. Spread the cream as smooth as possible over the top and sides.
10.Refrigerate the cake at least one hour to stabilize the whipped cream before glazing.

Chocolate Glaze:
11.Place the chopped chocolate in a medium bowl. Set aside.
12.In a small heavy saucepan over medium low heat, heat the cream until it is hot and just beginning to steam. Remove from heat and pour over the chocolate, stirring until the chocolate is completely melted. Add Lyle’s Golden Syrup and vanilla, stirring until completely mixed.
13.Pour the chocolate mixture into a pitcher, or liquid measuring cup with a pouring spout and let chocolate glaze cool for 10 minutes. Do not let the glaze sit longer than 10 minutes because it will thicken and become difficult to pour over the cake.
14.Slowly pour the glaze over the cake. Cover the top of the cake entirely, letting some of the glaze drizzle down the sides, and allowing some of the whipped cream show through the drizzles around the side of the cake.
15.Refrigerate the cake until the glaze is set and the whipped cream frosting is firm, at least one hour. Refrigerate Leftovers.
16.To serve, slice the cake with a long serrated knife, cleaning the knife between each slice.


The inside
I think Daddy liked it!
This was, by far, the hardest cake I have ever baked, but definitely the tastiest. I am so proud that it turned out well!  A smaller version of this cake is coming soon - it is the perfect balance of chocolate and light whipped cream.

Happy Baking!

Wednesday, August 18, 2010

Florida State University Cupcakes!

This weekend marks a very bittersweet occasion for my family - my youngest sister is leaving for college ... talk about feeling old! She is going to FSU, which, thankfully, is only 2 hours from me; not too far for lots of visits =)  I'm super duper proud of her though, and I know she will do just great!  Anyway, I am going to Alabama this weekend to visit family, so I wanted to send her to school with something from me, since I won't be able to help her move in.  Meeting new roomies can be stressful, so what better way to break the ice than delicious cupcakes with a little school spirit, and they just had to be chocolate because chocolate makes everything more fun!


To create these cupcakes, I used gold foil cupcake papers and an adaption of the classic Martha Stewart One-Bowl Chocolate Cupcakes from Martha Stewart's Baking Handbook.  I topped the cupcakes with maroon-colored buttercream icing, sparkly gold sprinkles, and a cute little FSU logo.  I think I achieved the 'garnet and gold' look I was going for.

One-Bowl Chocolate Cupcake Recipe (adapted from Martha Stewart):
1 1/4 cup all purpose flour
1/2 + 1/8 cup cocoa powder
1 1/4 cup sugar
1 1/4 tsp. baking soda
1/2 + 1/8 tsp. baking powder
1/2 + 1/8 tsp. salt
1 tsp. instant espresso powder
1 tsp. meringue powder
1 large egg + 1 egg yolk
1/2 + 1/8 cup milk
1/4 cup + 1 tbsp. unsweetened applesauce
1/2 + 1/8 tsp. pure vanilla extract
1/2 + 1/8 cup warm water

The best part about this recipe is that it is 'one-bowl'!  Simply sift together the flour, cocoa, sugar, baking soda, baking powder, salt, coffee, and meringue powder.  Add the eggs, milk, applesauce, vanilla, and warm water to the bowl, and beat on low with an electric mixer until the ingredients are just blended (about 2 minutes).  The batter will be very runny and you should see little fizzy bubbles on top.  Fill your prepared baking cups about 2/3 full and bake at 350 degrees for approximately 20 minutes.  TIP: When baking in foil cupcake papers, make sure you spray everything very well with nonstick spray or the liners will stick and the cupcake tops will be ruined!
The cakes baked up perfctly - firm enough to hold the icing, yet they had a light and fluffy texture
Vanilla Buttercream Frosting (from Wilton, medium consistency):
1 cup Crisco vegetable shortening
1/2 tsp. pure vanilla flavoring
1/2 tsp. butter flavoring
1 tsp. vanilla latte coffee creamer
9 tsp. milk or water
1 tbsp. meringue powder
1 lb. powdered sugar

This buttercream recipe uses Crisco because this summer heat tends to melt butter.  The Crisco holds up  much better, and the butter flavoring gives the yummy taste we are all looking for! To make the frosting,  cream together the shortening, flavorings, coffee creamer, and milk with an electric mixer.  Add the meringue powder and powdered sugar and beat until creamy.  I used one small container of  Wilton Christmas Red and 1/2 container of Wilton Burgundy icing colors to create the garnet color. To make the swirl, fill a disposable bag with icing and fit it with the 1M star tip.  Start at the edge of the cupcake and work around in a circle, applying firm pressure.  For these cupcakes, I left a little room around the edge so I could press in the sprinkles.

For the toppers, I cut out little FSU logos and taped them to toothpicks - super easy!

I just can't wait for my sister to taste and share these cakes - GO SEMINOLES! And, of course, Happy Baking!