Tuesday, October 26, 2010

Wilton Fondant and Gumpaste Final Cake

Last night was supposed to be my final Wilton Fondant and Gumpaste class.  However, my son got his 12 months shots earlier in the day, and was running a fever.  He was acting pretty pitiful, and I just couldn't leave him.  So, I did the cake at home!  The cake is a 6 inch, 2 layer White Velvet cake, iced in white chocolate buttercream and covered in homemade buttercream fondant.  The bow on top is gumpaste and the little dots are white chocolate buttercream.


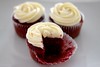
I have finally perfected my White Velvet cake recipe.  It started as a recipe I found on cakecentral.com - the first bake sunk in the middle and made a hard crust on the outside, but the flavor was so outstanding that I had to fix it!  So, finally, here is the recipe:

White Velvet Cake:
1 box Classic White Cake mix (I like Betty Crocker or Duncan Hines)
1 cup of all purpose flour
1/2 cup sugar
1 cup sour cream
2 1oz. boxes of white chocolate pudding mix
2 tbsp. oil
1/2 cup White Chocolate Mocha coffee creamer (International Delight brand)
3/4 cup water
4 egg whites
1 tsp clear vanilla (you can use pure vanilla, but it won't be a stark white cake)

Instructions:
Sift together dry ingredients.  Mix in wet ingredients until combined, continue to beat on low speed for 2 minutes.  Bake at 325 degrees until toothpick comes out clean - approximately 30 minutes.

White Chocolate Buttercream:
1 cup butter
1 cup Crisco vegetable shortening
2 lbs powdered sugar
1/2 tsp salt
1 tbsp meringue powder
1 tsp clear vanilla flavor
1/2 tsp clear almond extract
1/2 tsp clear butter flavor
2-4 tbsp whipping cream
2-4 tbsp White Chocolate Mocha coffee creamer (International Delight brand)

Instructions:
Cream together butter, shortening and all liquids until smooth and fluffy (start with the minimum of creamer and whipping cream, add more along the way to achieve the consistency you desire).  Add in sifted powdered sugar and continue beating until it all comes together.  Do not over beat, or you will incorporate too much air.

There are still a few things I would like to change about the buttercream fondant.  As it is right now, it is delicious and great once rolled out, but requires a little to much microwave action to get it pliable.  I will post the recipe once I feel it is 'perfect'. 


Close up of gumpaste bow
 
Close up of Buttercream beading
I am really happy with how this cake turned out - definitely one of my favorites.  Happy Baking!

Friday, October 22, 2010

Tie Cupcakes inspired by Men's Wearhouse

This evening, I made some cupcakes for my husband to take to his new job.  Since he started his job, I have had lots of quality alone time - he has been working 12 hours days all week!  I miss him and, I guess, baking is what I do to make myself feel better.  I had these cupcakes frozen, so I sat them out to thaw this morning.  They are a mixture of White Velvet cake, White Almond Sour Cream cake, and White Almond Sour Cream cake with berries.  They are each iced in white chocolate buttercream and the decorated with homemade buttercream fondant. Recipes will follow in a later post; here are some pictures:

Happy Baking!

Sunday, October 17, 2010

Transformer Cake!

Oh my goodness, what a weekend! I got my first wedding cake order, and I decided I needed to practice.  My sister had asked me to make a cake for her and some of her friends this weekend, so I thought it would be a great practice opportunity.  Wow, was I in for a night of surprises and lessons (learned the hard way). Would you ever guess that these two cakes are, actually, THE SAME CAKE?


Yep! This is the same cake.  The first picture is the final product (obviously), and the second picture is what I attempted to do last night.  I woke up this morning to a crack and droopy fondant circles! It was horrible. After reading around on cakecentral.com, I figured out what I had done wrong and decided that I was going to fix it.  SO, I disassembled the whole cake (dowels and all!) and started over.  I removed the broken layer, which is why the final cake is shorter.  I must say, that even though the final cake is not what my sister asked for, I love it.  The maroon fondant on the cake turned all the icing a nice shade of pale pink ... so I just went with it!

The recipe I used rendered horrible results, and I believe that it was the reason for the cake's downfall.  The cake took forever to finish in the middle, but the outside formed a hard crust that had to be carved off.  Even after baking over an hour, these cakes were still mushy in the middle.  Three out of four of them sunk. The difference in the soft middle and the hard outer edges made for discourse within the cake, resulting in the crack.  When I took the cake apart and removed the faulty layer, all was well again!  Needless to say, I won't be sharing the recipe I used until I make some adjustments ;-)

This adventure gave me LOTS of practice and I feel a lot better about my buttercream skills on the final cake - all those youtube videos I watched while trying to figure out what I did wrong the first time really  helped! Here are some more close-up pictures:

Pretty monogram and reverse shell border

Royal Icing Roses
 Happy Baking!

Monday, October 11, 2010

Wilton Gum Paste and Fondant Class

This month, I have been taking the Wilton Gum Paste and Fondant Class.  We don't bake much, except for the final cake, but we make flowers and bows every week.  Everything is made from a half and half mix of fondant and gum paste, and most is made in stages to allow for proper drying. I just finished my second class in the course, and I wanted to share some of my work!

Two Calla Lilies, Carnation, and medium sized Rose
 
Close up of Rose with calyx and leaves

Gum Paste Bow

Everything from this course so far!

We are learning more flowers next week, and the following week we will produce our first complete cake decorated with fondant and gum paste - I'm super excited!

Happy Baking!

Thursday, October 7, 2010

Lemon Walnut Cupcakes!

 I have done it! I have found the one 'sweet treat' my husband adores!  He is not much on sweets, but he has raved about these cupcakes (especially the lemon buttercream), and I must admit, that is a good feeling for his wife, the 'baker' =)  This recipe is adapted from  1001 Cupcakes, Cookies and Tempting Treats - a book my Daddy gave me for my birthday this year (thanks, Dad!). It is a grown-up cupcake, and tastes like an absolute dream.  The lemon mixed with the walnut just does it somehow.  This is the first time I have made buttercream with actual butter instead of Crisco in a long time, and I had forgotten how much of a difference it makes.  I am excited to get to do this more now that it has cooled down and the humidity won't melt the butter! The only complaint I have about this recipe from the book is that it only made enough batter for 6 cupcakes, where the recipe said it would make 12.  Now, I like a "full" cupcake, but even if I had only half filled the papers, I don't think I would have gotten 12 cupcakes.  SO, next time I will for sure double the recipe. 


Lemony Walnut Cupcakes Recipe (adapted from the 1001 Cupcakes, Cookies and Tempting Treats 'Moist Walnut Cupcakes' recipe):
heaping 1/4 cup chopped walnuts*
4 tbsp butter, softened and cut into pieces
1/2 cup sugar*
grated rind of 1/2 lemon
1/2 cup self rising flour (1/2 cup all purpose flour + 1/4 tsp. salt + 3/4 tsp baking powder*)
2 eggs
6 walnuts for decoration*

Lemon Buttercream Recipe:
4 tbsp. butter, softened
3/4 cup confectioner's sugar + a little to adjust thickness*
grated rind of 1/2 lemon
2 tsp. lemon juice*
1 tsp. milk*

*Changes I made to the recipe - I chopped my walnuts instead of putting them in the food processor, used regular sugar instead of superfine, used a self rising flour substitute because I did not have self-rising on hand, and only had to use 6 walnuts because the recipe only made 6 cupcakes, not 12.  In the frosting, I had to add a little more sugar, extra lemon juice and some milk to get it to the consistency I like.

Method:
 Chop your walnuts into small pieces.  Cream together butter and sugar until fluffy, then add the eggs one at a time until completely combined.  Add in the remaining ingredients and blend until just combined.  Line 6 places in a cupcake pan with papers and fill about 2/3 full with batter.  Bake at 350 degrees for approximately 14 minutes or until a toothpick inserted in the center comes out clean.  Cool completely.
For frosting, beat butter, juice, and milk together until smooth.  Add sugar and beat until an icing forms. I frosted using a 1M star tip to make a swirl on top.

The recipe in the book said to chop the walnuts in the food processor and then add the rest of the ingredients to the processor and pulse until a batter formed.  While this would be faster, I prefer my method. Plus, my food processor is a big mess to use and clean, and it was late =)


You MUST try these! I promise you won't be disappointed!

Happy Baking!